

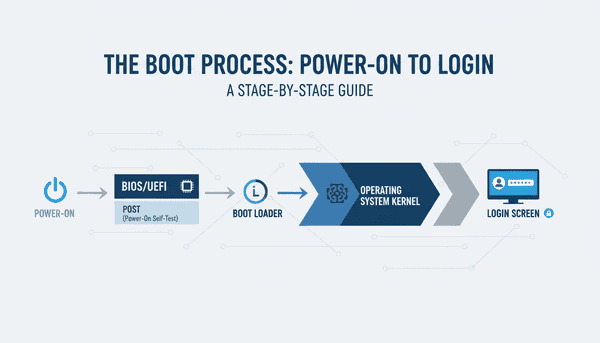
Have you ever wondered what happens between the moment you press your computer’s power button and the moment you see your desktop?
It may seem like your computer simply turns on and loads Windows, macOS, or Linux. In reality, several important steps happen before the operating system is ready for you to use.
This sequence is called the computer boot process.
During the boot process, the computer powers up its hardware, checks that important components are working, finds a device containing an operating system, loads the operating system’s core components, and eventually presents you with a login screen or desktop.
Understanding the boot process is useful for anyone who uses a computer. It can also help you troubleshoot problems when a computer won’t start properly.
Let’s walk through what happens from the moment you press the power button.
What Is the Computer Boot Process?
The boot process is the sequence of events a computer performs when it starts up.
The word “boot” comes from the idea of a computer “pulling itself up by its bootstraps.” In technical terms, booting means starting the computer and loading the software necessary to operate it.
A simplified version of the process looks like this:
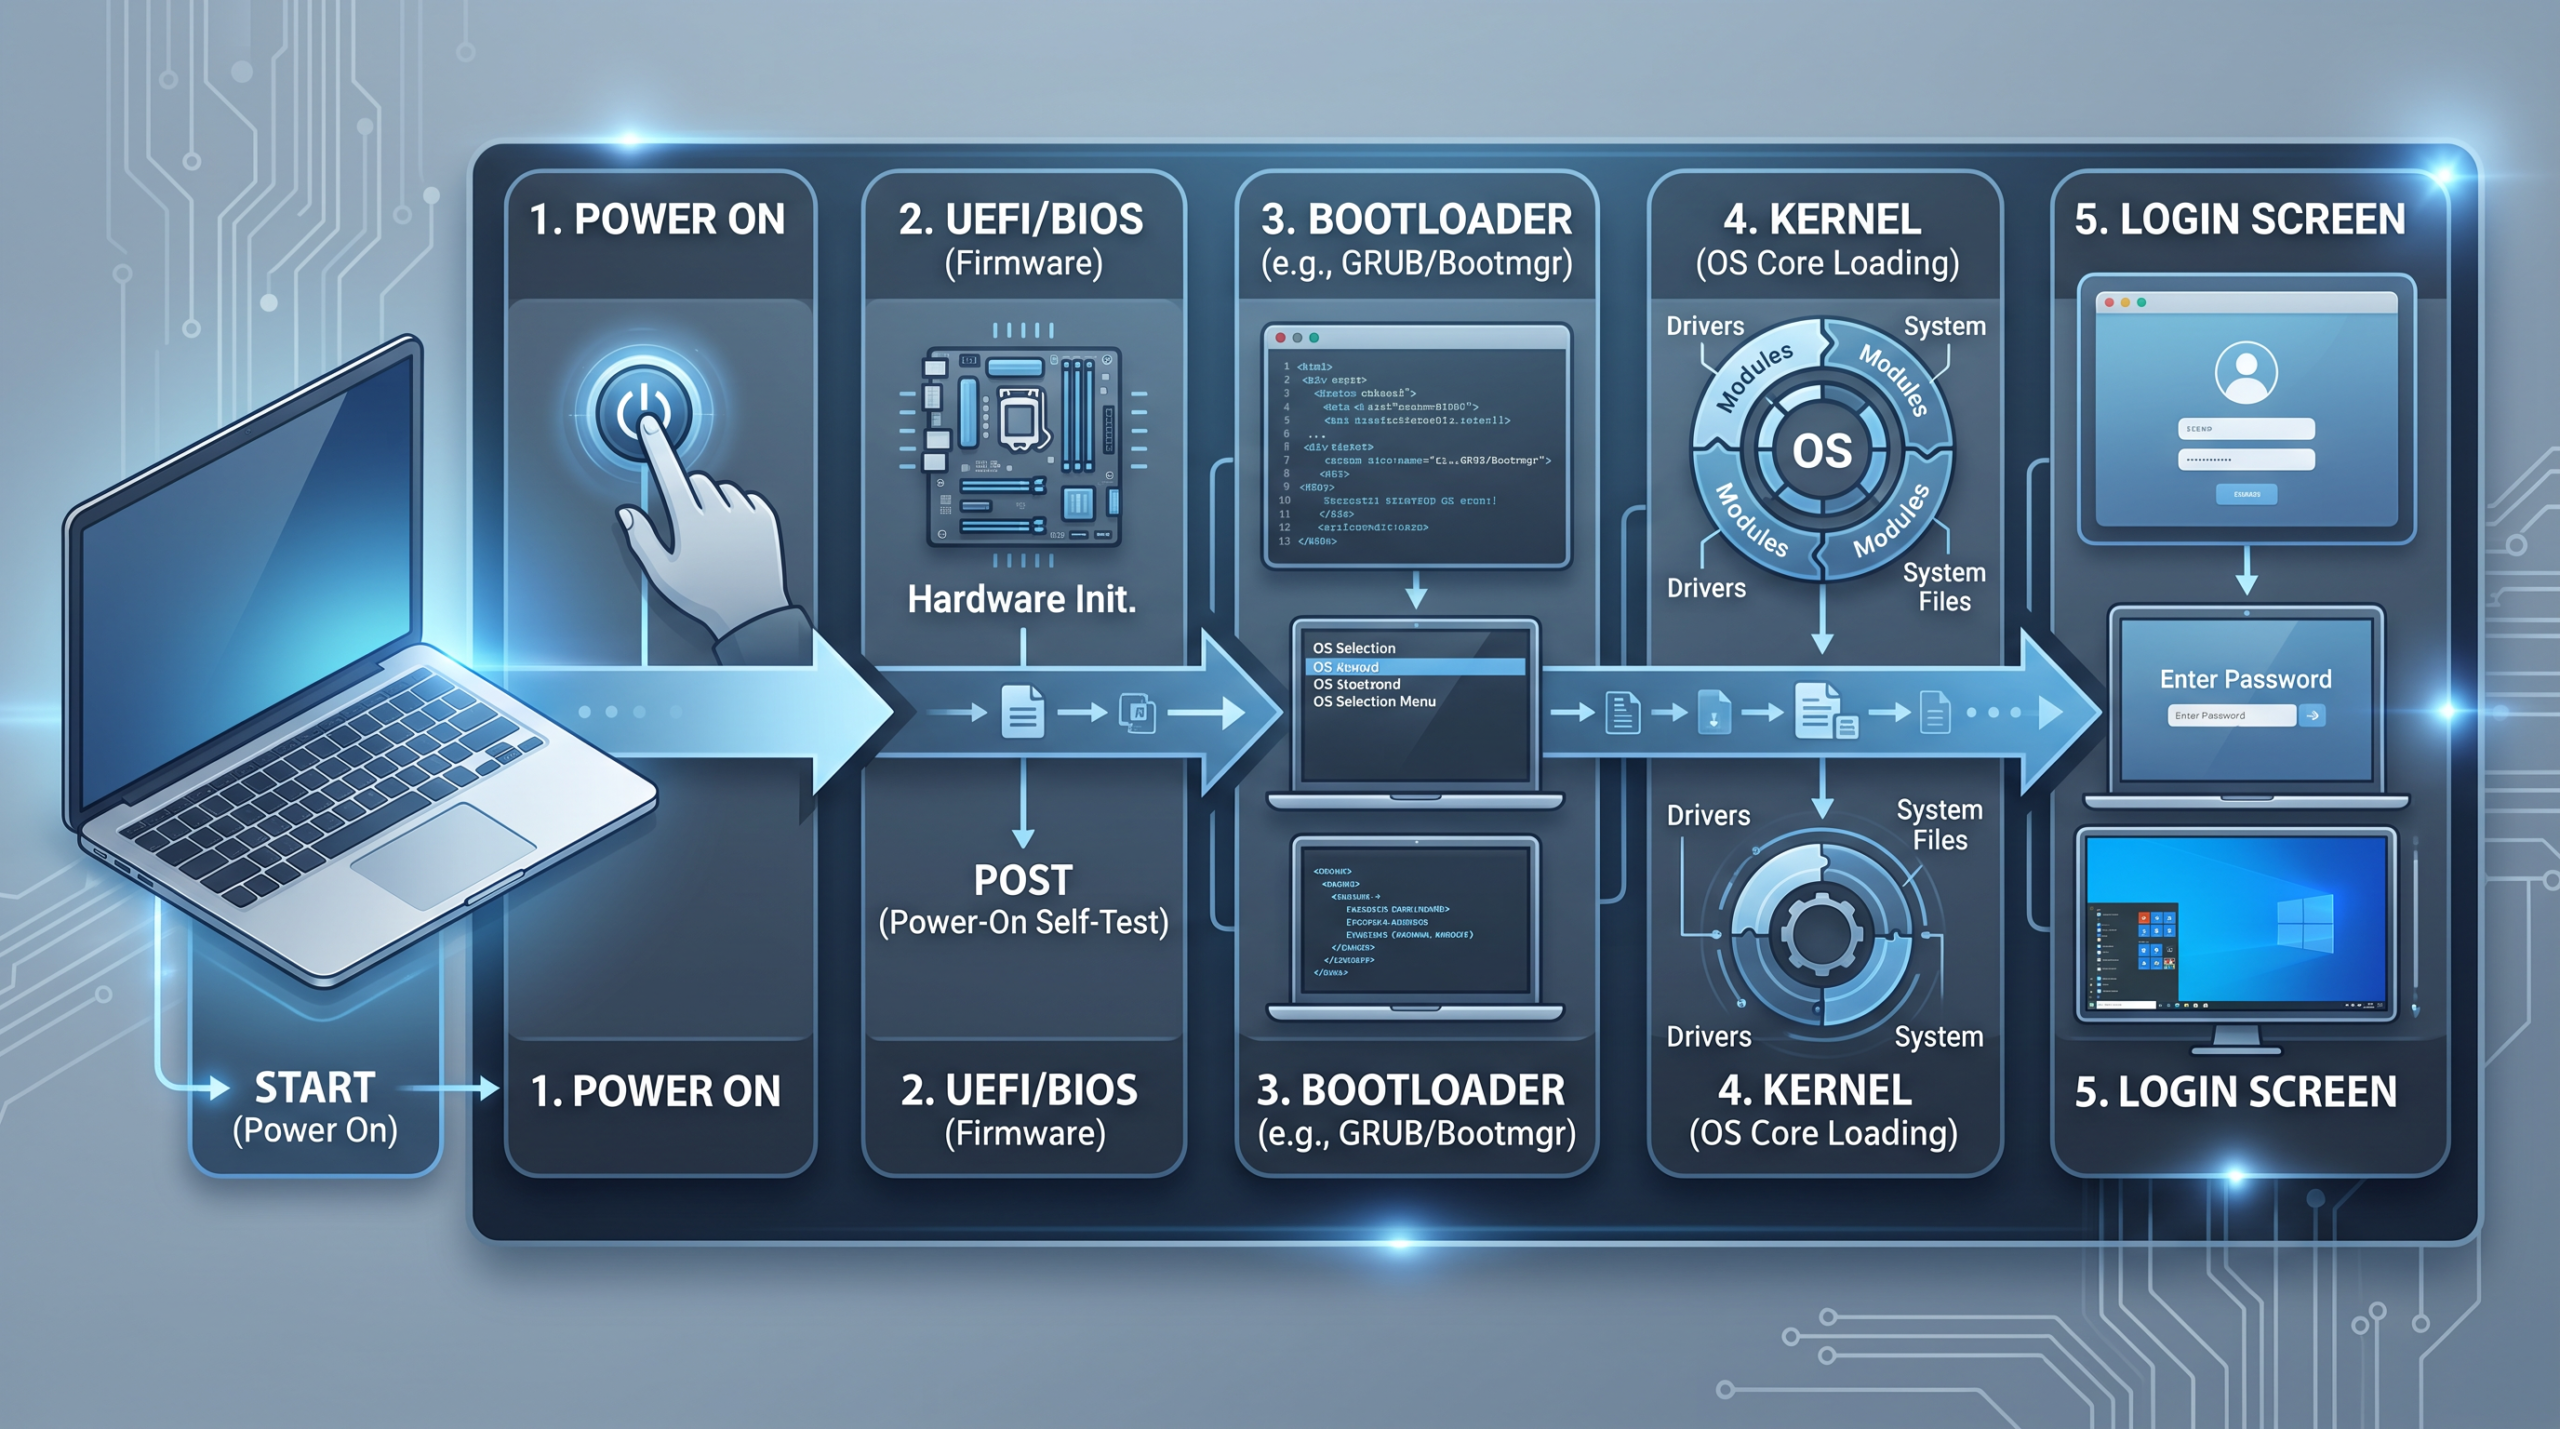
Power On → Firmware → POST → Boot Device → Bootloader → Operating System Kernel → Drivers & Services → Login → Desktop
Each step has a specific purpose.
Step 1: You Press the Power Button
Everything starts when you press the computer’s power button.
The power supply provides electrical power to the computer’s components. In a desktop computer, the power supply converts electricity from the wall outlet into the different voltages required by the motherboard, processor, storage devices, memory, and other hardware.
A laptop works somewhat differently because it can receive power from either its battery or an AC adapter, but the basic idea is the same: the computer’s hardware needs to receive power before it can begin operating.
Once the motherboard receives the necessary power signals, it begins the startup process.
The CPU, or central processing unit, is one of the most important components involved. The CPU is responsible for executing the instructions that tell the computer what to do.
But there is an immediate problem.
The CPU needs instructions to execute.
Where do those instructions come from?
That’s where firmware comes in.
Step 2: The CPU Starts Running Firmware
When a computer first starts, the CPU doesn’t immediately load Windows, Linux, or another operating system.
Instead, it begins by executing instructions stored in the computer’s firmware.
On modern PCs, this firmware is typically UEFI, which stands for Unified Extensible Firmware Interface.
Older computers commonly used BIOS, or Basic Input/Output System.
You may still hear people use the term “BIOS” when talking about the firmware on a modern computer, even though most newer systems actually use UEFI.
The firmware provides the initial instructions needed to get the computer ready to load an operating system.
It can:
- Initialize hardware
- Check system components
- Identify available storage devices
- Determine which device should be used to boot
- Provide configuration options
- Start the operating system’s bootloader
In other words, firmware acts as the bridge between the computer’s hardware and the software that needs to start.
Step 3: The Computer Performs POST
One of the first things the firmware does is perform a process called POST.
POST stands for Power-On Self-Test.
POST checks important hardware to make sure the computer can continue starting normally.
Depending on the system, POST may check components such as:
- CPU
- RAM
- Keyboard
- Storage controllers
- Graphics hardware
- Other essential motherboard components
If everything looks normal, the computer continues to the next stage.
If something is wrong, the computer may display an error message, produce beep codes, or stop during startup.
For example, if the system cannot properly detect its memory, it may fail POST and never reach the operating system.
This is one reason the symptoms of a computer problem can tell you something about where the problem is occurring.
If the computer doesn’t even reach the manufacturer’s logo, the problem may be related to power, hardware, firmware, or POST.
If the computer gets much further but cannot find an operating system, the problem may be related to storage or the boot process.
Step 4: The Firmware Finds a Boot Device
Once the basic hardware checks are complete, the firmware needs to find something to boot.
Most computers have an operating system stored on an internal SSD or hard drive.
However, a computer can potentially boot from several different sources, including:
- Internal SSD
- Internal hard drive
- USB flash drive
- DVD or other optical media
- Network device
The firmware uses a boot order to determine which device it should try first.
For example, a computer might be configured to look for bootable media in this order:
- USB drive
- Internal SSD
- Network
If a bootable USB drive is connected, the computer might start from that device instead of the operating system installed on the internal SSD.
This is commonly used when installing an operating system or running diagnostic tools.
Step 5: The Bootloader Takes Over
After the firmware identifies a bootable device, it starts a program called a bootloader.
The bootloader has an important job: it helps load the operating system.
The exact bootloader depends on the operating system.
For example, Windows systems use Windows Boot Manager, while many Linux systems use bootloaders such as GRUB.
The bootloader can locate the necessary operating system files and begin loading them into memory.
On computers with multiple operating systems installed, the bootloader may also provide a menu allowing the user to choose which operating system to start.
For example, someone might have both Windows and Linux installed on the same computer. The bootloader can present a menu asking which operating system the user wants to launch.
Once the bootloader has done its job, control moves toward the operating system itself.
Step 6: The Operating System Kernel Loads
The next major stage is loading the kernel.
The kernel is one of the most important parts of an operating system.
Think of the kernel as the central manager that allows software to interact with the computer’s hardware.
It manages resources such as:
- CPU time
- Memory
- Storage
- Hardware devices
- Processes
- Security and system permissions
When the kernel starts, it begins taking control of the computer’s resources.
The operating system also begins initializing hardware and loading the drivers needed to communicate with devices.
For example, the operating system may need drivers to communicate with:
- Graphics hardware
- Network adapters
- Audio hardware
- USB devices
- Storage controllers
- Printers and other peripherals
At this point, the computer is getting much closer to being usable.
Step 7: Drivers and System Services Start
Loading the kernel isn’t the end of the boot process.
The operating system still needs to start many additional components.
These include device drivers and system services.
A device driver is software that allows the operating system to communicate with a particular piece of hardware.
For example, a graphics driver allows the operating system and applications to communicate with the graphics hardware.
System services perform background tasks needed by the operating system.
Depending on the operating system, these services might handle things such as:
- Networking
- Security
- User accounts
- File systems
- Updates
- Time synchronization
- Hardware management
- Background applications
Some of these processes happen quickly and may not be visible to the user.
Others can take longer, particularly if the computer has many startup applications or is performing updates.
Step 8: The Login Screen Appears
Eventually, the operating system reaches the point where it can interact with the user.
You may see a login screen asking for a password, PIN, fingerprint, facial recognition, or another form of authentication.
The computer is now ready to determine which user is allowed to access the system.
After you authenticate, the operating system loads your user profile.
This can include things such as:
- Desktop settings
- Personal files
- Application preferences
- Network settings
- Background applications
- Accessibility settings
The exact process varies between Windows, macOS, Linux, and other operating systems.
Step 9: The Desktop Loads
Finally, you see your desktop.
At this point, it may feel like the computer has finished starting.
However, there can still be activity happening in the background.
The operating system may continue loading:
- Startup applications
- Cloud synchronization tools
- Security software
- Updates
- Background services
- Network connections
- Other applications configured to start automatically
This is why a computer can sometimes feel slow immediately after logging in even though the desktop is already visible.
The computer is still finishing some of its startup work.
The Computer Boot Process at a Glance
The entire process can be summarized in a simple sequence:
1. Power On
The computer receives power and begins initializing its hardware.
↓
2. Firmware
UEFI or BIOS begins executing startup instructions.
↓
3. POST
The computer checks important hardware components.
↓
4. Boot Device
The firmware finds a device containing bootable software.
↓
5. Bootloader
The bootloader begins loading the operating system.
↓
6. Kernel
The operating system’s core loads and takes control of system resources.
↓
7. Drivers & Services
Hardware drivers and essential operating system services start.
↓
8. Login
The operating system authenticates the user.
↓
9. Desktop
The user environment loads and the computer becomes ready for normal use.
BIOS vs. UEFI: What’s the Difference?
You will often hear the terms BIOS and UEFI when discussing the boot process.
Both provide firmware that helps initialize the computer and start the operating system, but UEFI is the newer technology.
BIOS
BIOS has been used in personal computers for decades.
It provides basic hardware initialization and starts the boot process.
Traditional BIOS has several technical limitations, including limitations associated with older disk partitioning and boot methods.
UEFI
UEFI was designed as a modern replacement for traditional BIOS.
It provides additional capabilities, including:
- Support for modern hardware
- Support for larger storage devices
- A more flexible firmware environment
- Faster startup options
- Secure Boot
- Graphical configuration interfaces on many systems
Most modern computers use UEFI firmware.
You may still see the term “BIOS settings” in computer documentation because BIOS has become a common general term for the system firmware configuration interface.
What Is Secure Boot?
If you’ve explored UEFI settings, you may have encountered an option called Secure Boot.
Secure Boot is a security feature designed to help ensure that trusted software is loaded during the early stages of the boot process.
Without protections like Secure Boot, malicious software could potentially attempt to run before the operating system’s normal security mechanisms are active.
Secure Boot uses digital signatures to help verify that boot components are trusted.
It is one of several technologies designed to improve security during startup.
What Is a Cold Boot?
A cold boot generally refers to starting a computer from a powered-off state.
For example:
You shut down your computer completely and then press the power button.
The system must initialize the hardware and go through the normal startup sequence.
A restart is slightly different.
When you select Restart, the computer does not necessarily have to perform exactly the same sequence as a completely powered-off system. The operating system can shut down and restart while some hardware remains initialized or firmware features can optimize parts of the process.
The exact behavior depends on the operating system and hardware.
What Happens When a Computer Won’t Boot?
Understanding the boot process can make troubleshooting much easier.
Different problems can occur at different stages.
The computer has no power
If nothing happens when you press the power button, the problem could involve:
- Power cables
- Power supply
- Battery
- Power adapter
- Motherboard
- Power button
The computer powers on but doesn’t complete POST
This may indicate a hardware or firmware problem.
Potential causes include:
- Faulty or improperly installed RAM
- CPU problems
- Motherboard problems
- Graphics hardware issues
- Other hardware failures
The computer says there is no boot device
The firmware may not be able to find a device containing a usable operating system.
Possible causes include:
- Failed SSD or hard drive
- Incorrect boot order
- Disconnected storage
- Corrupted boot information
- Missing operating system
The bootloader starts but the operating system doesn’t load
This can indicate a problem with the operating system or its files.
Potential causes include:
- Corrupted system files
- Failed updates
- Damaged boot configuration
- Driver problems
- Storage errors
The important point is that where the computer stops during startup can provide clues about what is wrong.
Why Does Understanding the Boot Process Matter?
You don’t need to be a computer technician to benefit from understanding how a computer boots.
Knowing the basic sequence can help you:
Troubleshoot problems
If your computer stops before the operating system starts, you can narrow down where the problem might be occurring.
Understand technical terminology
Terms such as BIOS, UEFI, POST, bootloader, kernel, and driver become much easier to understand when you know where they fit into the startup process.
Install operating systems
Installing Windows or Linux often requires interacting with firmware settings, boot devices, and bootloaders.
Understand computer security
Features such as Secure Boot make more sense when you understand that software loads before the operating system is fully running.
The Boot Process Is a Chain of Events
The next time you press your computer’s power button, remember that the operating system doesn’t simply appear.
A series of events takes place:
Power → Firmware → POST → Boot Device → Bootloader → Kernel → Drivers → Services → Login → Desktop
Each stage prepares the computer for the next one.
The firmware initializes the hardware. POST checks that important components are functioning. The bootloader finds and starts the operating system. The kernel takes control of system resources. Drivers and services prepare the operating system, and finally the user environment appears.
What looks like a simple process to the user is actually a carefully coordinated sequence involving hardware, firmware, and software.
And that’s what happens behind the scenes every time you turn on your computer.
Comments (0)